Wednesday 30 August 2017

Setup MEAN Stack with Angular 2 in Ubuntu 16.04

Steps to install and configure MEAN stack necessary application in Ubuntu 16.04

Install the following:
  1. MongoDB/NoSQL             sudo apt-get install mongod
  2. Express JS globally            sudo npm install -g express
  3. Angular CLI                       sudo npm install -g angular/cli
  4. Node JS and npm               sudo apt-get install nodejs npm


To upgrade to latest NodeJS

sudo npm cache clean -f
sudo npm install -g n
sudo n stable

sudo ln -sf /usr/local/n/versions/node/<VERSION>/bin/node   /usr/bin/nodejs

(NOTICE that the default installation for nodejs is in the /usr/bin/nodejs and not /usr/bin/node)

To upgrade to latest version (and not current stable) version, you can use the following:

sudo n latest


Other useful nifty commands:

npm init
creates a package.json in root for you

npm list
lists all installed packages

npm prune
removes packages not depended on by your project according to your package.json

npm outdated
tells you which installed packages are outdated with respect to what is current in the npm registry but allowable by the version definition in your package.json

Friday 12 May 2017

Convert your website into Android application using android studio

Converting your website to Hybrid android application using Android Studio

I am using android studio IDE to achieve the same. Get it from the below link:
https://developer.android.com/studio/install.html

To do this, in the first place the website should be responsive to android devices.

I followed the below tutorial to convert the website to android apk

1) Follow the tutorial to convert your site: (Thanks to the site!!)
    http://abhiandroid.com/createandroidapp/webview-android-app

   Basically the main changes required are from the below files:
   a. activity_main.xml
   b. MainActivity.java
   c. AndroidManifest.xml

2) Once the changes are done, run the application in the studio. You should get Build Success.

3) To generate an apk file and install it in your real device:
     Go to Build-> Select Build APK

     Once you get an option to open the build apk in the explorer, you can use the same in android devices!! And I believe one need not learn android to create an apk for building Hybrid application..Cool ha :D !!

4) Now to change the default launcher ic_launcher icon of the android app:

5) You can do this too almost easily: Head to https://romannurik.github.io/AndroidAssetStudio/
    Build your icons and download the zip package. (Note: Do not start your logo name with caps)
    Extract the zip package to the following path:  
    app\src\main\   into the 'res' folder.

Monday 17 April 2017

Configure Magento headers to call Rest API in Angular 2

Below are the steps to configure CORS (Cross Origin Resource Sharing) in the server(Magento) to call its API in frontend (Angular 2).


The below procedure is a fix for different CORS based error scenarios like:

  1. Response for preflight has invalid HTTP status code 400
  2. Response for preflight has invalid HTTP status code 405
  3. No 'Access-Control-Allow-Origin' header is present on the requested resource. Origin 'http://10.22.1.168:3000' is therefore not allowed access.
  4. Request header field authorization is not allowed by Access-Control-Allow-Headers
  5. Request header field content-type is not allowed by Access-Control-Allow-Headers


Step 1:      In the .htacess of Magento,under <IfModule mod_rewrite.c>  replace

                  RewriteCond %{REQUEST_METHOD} ^TRAC[EK]
                  with
                  RewriteCond %{REQUEST_METHOD} OPTIONS

Step 2:      RewriteRule .* - [L,R=405]   with
                  RewriteRule ^(.*)$ $1 [R=200,L]

Step 3:      To the end of the page, there is another <IfModule mod_headers.c> (around line ~120)
                  Under this tag,add the below 2 lines:
             
                  Header always set Access-Control-Allow-Origin "*"

            Header always set Access-Control-Allow-Headers "Origin, X-Requested-With, Content-Type, Accept, Authorization"

Note: Dont forget the word 'always'.

Step 4:
                 Make sure to activate the apache module headers:
        a2enmod headers

After changes my .htaccess looks like:

... ....
 ....
<IfModule mod_rewrite.c>
Options +FollowSymLinks
    RewriteEngine on
    RewriteRule .* - [E=HTTP_AUTHORIZATION:%{HTTP:Authorization}]
#RewriteCond %{REQUEST_METHOD} ^TRAC[EK]
    RewriteCond %{REQUEST_METHOD} OPTIONS
    RewriteRule ^(.*)$ $1 [R=200,L]
#RewriteRule .* - [L,R=405]
    RewriteCond %{REQUEST_FILENAME} !-f
    RewriteCond %{REQUEST_FILENAME} !-d
    RewriteCond %{REQUEST_FILENAME} !-l
    RewriteRule .* index.php [L]
</IfModule>

...
...
ErrorDocument 404 /pub/errors/404.php
ErrorDocument 403 /pub/errors/404.php
<IfModule mod_headers.c>
Header always set Access-Control-Allow-Origin "*"
Header always set Access-Control-Allow-Headers "Origin, X-Requested-With, Content-Type, Accept, Authorization"
Header always set X-UA-Compatible "IE=edge"
    <FilesMatch "\.(appcache|atom|bbaw|bmp|crx|css|cur|eot|f4[abpv]|flv|geojson|gif|htc|ico|jpe?g|js|json(ld)?|m4[av]|manifest|map|mp4|oex|og[agv]|opus|otf|pdf|png|rdf|rss|safariextz|svgz?|swf|topojson|tt[cf]|txt|vcard|vcf|vtt|webapp|web[mp]|webmanifest|woff2?|xloc|xml|xpi)$">
        Header unset X-UA-Compatible
    </FilesMatch>
</IfModule>


My Frontend (Angular 2) logic looks something like:

import { Injectable } from '@angular/core';
import { Http, Response,Headers,RequestOptions,RequestMethod} from '@angular/http';

export class ProductService {
    public _productUrl = 'http://10.22.1.168/Mage_ang2/index.php/rest/V1/customers/1';

    constructor(private _http: Http) { }

    getProducts(): Observable<IProduct[]>
{
let headers = new Headers({'Content-Type': 'application/json;charset=UTF-8',
'Authorization':'Bearer ntthnrbj1uam2tuv1ekva7n18mcnkby3'
});

 return this._http.get(this._productUrl,{headers:headers})
        .map(response => {
            return response.json();
        });
    }

The Authorization Bearer key was generated as below:

To get the bearer token:

1) Login to Magento admin, create a user role and a user in admin

2) To get bearer token :

    curl -X POST "http://<localhost/IP>/Magento2/index.php/rest/V1/integration/customer/token" -H "Content-Type: application/json" -d '{"username":"restuser_name","password": "restuser_password"}'

Explanation :


RewriteCond %{REQUEST_METHOD} OPTIONS 
RewriteRule ^(.*)$ $1 [R=200,L] 
Apache will respond "200 OK" when the request method is OPTIONS


Header set Access-Control-Allow-Origin "*"
Giving global cross-origin access to Magento. Usually its a bad idea to give * from a security perspective. 
Suggested way is to give the the origin(domain+scheme+port number) site URL in place of *.
Eg: Access-Control-Allow-Origin: http://siteA.com

ie) When Site A tries to fetch content from Site B, Site B can send an Access-Control-Allow-Origin response header to tell the browser that the content of this page is accessible to certain origins.
By default, Site B's pages are not accessible to any other origin; using the Access-Control-Allow-Origin header opens a door for cross-origin access by specific requesting origins.


Header always set Access-Control-Allow-Headers "Origin, X-Requested-With, Content-Type, Accept, Authorization
 Each header must explicitly be listed and I added x-test-header to Access-Control-Allow-Headers


References:

https://benjaminhorn.io/code/setting-cors-cross-origin-resource-sharing-on-apache-with-correct-response-headers-allowing-everything-through/

http://stackoverflow.com/questions/32500073/request-header-field-access-control-allow-headers-is-not-allowed-by-itself-in-pr


Monday 13 February 2017

Creating custom theme in Magento 2

Hi Guys,

Here i will be providing explanation on how to create your own theme in Magento 2 so that you can play around with your design and look and feel :) 

Out-of-the-box Magento provides two default design themes:
        Luma, as a demonstration theme
        Blank as a basis for custom theme creation.

But if you want to customize the default design theme, you need to create a new theme as im going to show below:

1) Create your theme directory and declare your Magento2 theme: 

    Create a new Vendor folder(SachTheme) by navigating to:
    <your Magento 2 root directory>/app/design/frontend/SachTheme

   Create theme folder inside Vendor folder:  app/design/frontend/SachTheme/theme-new 

    Create theme.xml  under
   app/design/frontend/SachTheme/theme-new/theme.xml as

   <!--
/**
 * Copyright © 2016 Magento. All rights reserved.
 * See COPYING.txt for license details.
 */
-->
<theme xmlns:xsi="http://www.w3.org/2001/XMLSchema-instance" xsi:noNamespaceSchemaLocation="urn:magento:framework:Config/etc/theme.xsd">
   <title>Sach New Theme</title>
   <parent>Magento/blank</parent>
   <media>
       <preview_image>media/preview.jpg</preview_image>
   </media>
</theme>


Copy the default media/preview.jpg from app/design/frontend/Magento/luma/media/preview.jpg
OR if the file is not found under the above path, use the one below:
Under :  vendor/magento/theme-frontend-luma/media/preview.jpg

2) Add registration.php to register your new custom Magento 2 theme

    To register your theme in the Magento system, you need to create registration.php file in your theme directory: app/design/frontend/SachTheme/theme-new/registration.php

<?php
/**
 * Copyright © 2016 Magento. All rights reserved.
 * See COPYING.txt for license details.
 */

\Magento\Framework\Component\ComponentRegistrar::register(
    \Magento\Framework\Component\ComponentRegistrar::THEME,
    'frontend/SachTheme/theme-new',
    __DIR__
);

3) Finally, clear var/cache and var/page_cache before logging into Magento 2 Admin.

     In the root of magento 2 in command prompt:  php bin/magento cache:flush

4) Navigate to:  Content-> Design-> Configuration and Select your newly created theme


Monday 5 December 2016

Angular 2 Getting started


Angular 2 is one of the fastest web app java script framework for building our web application.
It can be added to our HTML page using the <script> tag.

1) Angular 2 application anatomy:


>These components can be pulled together to form an application by defining an "Angular Module".
 
>Every Angular application has atleast one Angular module called the "Angular root module"(app) and also an application can have any number of additional angular modules including Angular feature module that consolidates the components into specific application feature.


 2) Languages that can be used for developing Angular JS (Language Selection)

       a)    The JS Language specification feature is officially called the ECMAScript (ES).

               Different versions of ES:
               * ES 3 - Supported by older broswers
               * ES 5- Current version
               * ES 2015 (ES 6) - Must be Transpiled (compiled by a tool to ES 5) before the browser     executes it...


 3) Selecting an Editor :


4) Setting up Enviornment:


     npm  –  Is a CLI utility that interacts with the repository of open source projects.

--   Package manager for java script

--   To install all lib of angular
            --   Download from npmjs.com

   Setting up the Angular JS application manually: (Can be referred for documentation in www.angular.io)


    Alternate steps:


                           a) Tooling :Angular CLI:
                           
Its a CLI for generating the setup files and boilerplate code for A2 application (including Scaffolding unit and end to end test)

b) Starter files for building our application, i have referred from git hub
              https://github.com/Sachin-Suresh/Angular2-Getting-started--Components-Interpolation-and-Databinding-


From the above github link, i have  downloaded and pasted the APM Start into my work space folder in my drive say and opened using my VS code editor.


Understanding the directory structure:

> All the files specific for our application are under the app folder.

> These are the setup files:


5) Now we have to install all the libraries required for running our Angular 2 application:

   * Open any terminal (i have used Babun tool) with the application root directory and type 'npm install'


   * This installs all the libraries we need and typescript. Ignore the warnings.

   * We get a tree structure in the end which shows the installation is complete.

  * We get a node modules folder and typings folder post npm installation:


   * Type npm start to start the application server.

   * Once the server is started hit the below URL:


   * Notice the code structure:


 For every .ts file we get .map file and .js file

Process: The start script started the TypeScript compiler, which transpiled all the .ts file to ES js file (.js file) that browser can understand.

.map file: is the source map generated by the compiler which helps debug .ts code


To stop the server: use Ctrl +C 


6) Modules

 * Modules are used to resolve namespace issue in Angular2 application.

 *  In ES 2015, a module is a file and vice versa.

 * We just create a file and write some code and import/export, the file becomes a module.

  * Angular 2 has something called Angular 2 modules.


7) Component:

    A component includes:

    a) A View defined in a template
 
    b) Its associated code defined within a Class (Properties, Methods)
         A Class becomes a function when we give a metadata.

    c) Metadata defined with a  Decorator (an angular component function)
             Decorator is a function that adds Metadata to a class, its members.
             Always prefixed with @


Example of a component in a TypeScript:


Explanation of the above code from bottom:

Class definition:

Angular convention of naming a class:

* classname followed by suffix 'Component'.
* This classname is the Component name.
* The root component of an application is 'AppComponent'
* Since the above class 'exports', it is called as an ES Module.
* The class 'AppComponent' has only 1 property 'pageTitle' of type string and no methods.


class <classnameComponent>  {
   //properties
   propertyName: type = 'some value';

   //methodNames...


Next, we need to define the template for the above class.? How...? Using the Metadata.

Defining a Metadata with Decorator:

We define the Angular Metadata, with the Angular Component function, by attaching to the class as a Decorator.

Format:

@Component( {objects
     Properties...}

)


Importing


Some Angular library modules:

@angular/core
@angular/animate
@angular/htpp
@angular/router
...

Other list of Angular library modules can be found at:

http://www.npmjs.com/~angular 

 8) Bootstrapping the application:


Bootstrapping our app.component.ts:


 Where the 'bootstrap' array defines the root component of the application ie AppComponent .


Working Code : A sample of the Angular 2 application demo has been uploaded in the git hub url below which covers:


    a) Creating a component class, Decorator , App component
    b) Building a template and using component as a directive. (ngIf anf ngFor)
    c) Data Binding and Pipes.


    https://github.com/Sachin-Suresh/Angular2-Getting-started--Components-Interpolation-and-Databinding-


   INTERFACES

* To specify custom types, we can define Interfaces.
* Prefixed by I

* ES 5 and ES2015 does  not support Interfaces, but TypeScript does!!

An Interface is :


ie) The class contains the properties and methods identified by each interface.

Example:

* An Interface is a specification:


> export interface interfaceName
> Body  defines the set of properties :  propertyName : propertydatatype
>  methodName (listofparameters : dataType) : methodReturnType

* To use the Interface as a DataType 


TIP: To hide unnecessary .js and .map files in Visual Code editor,
File->Preferences->WorkspaceSettings: add .js and .map in exclude settings


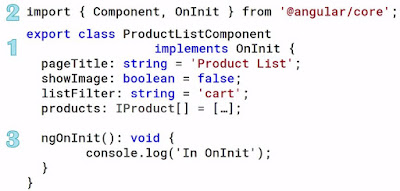
Using LifeCycle Hooks (Component Life Cycle)


Some of the major Life Cycle hooks are as:


To use a LC hook, 

* We implement the LifeCycle hook Interface. (ie one Interface for each LifeCycle hook)
   eg: The interface for the OnInit LC hook is OnInit

* Each LifeCycle hook interface defines one method whose name is the interface name prefixed with  ng   ie) for OnInit interface, method is ngOnInit